A Recipe Re-Run
BLUEBERRY SALSA
Originally found HERE on one of my favorite blogs, My Own Sweet Thyme .
And my first attempt HERE in a post with other blueberry creations, I have  now decided this salsa deserves it's own post. I made it for work along with two other salsas (Thai curry and yellow tomato, and chipotle and roasted tomato).
Inspired by three plump and very ripe tomatoes sitting on our common meeting table at work, we decided to make some salsa and have chips to make our Thursday more exciting.

Blueberries are not really in season right now but, I found a tiny container at Whole Foods for $5.00. I almost skipped getting them but, at the last minute sneaked them into my basket. I am so glad I did.
This salsa is going to kick ass and is MY favorite.

Blueberry Salsa Recipe:
1 1/2 cup fresh blueberries, coarsely chopped
2 tbs lime juice
1 tsp vanilla extract
1 -2 Tbs Cilantro, medium chopped

1 med shallot, finely chopped
1 heaping Tbs freshly grated ginger (YUM)
1 medium Serrano chili, seeds extracted. Minced twice * be careful while mincing these hot buggers*
1 tsp coarse sea salt

-Gently toss the first four ingredients together in your salsa bowl. Cover and set aside. Chill.
-Then, in a separate bowl mix the rest of the ingredients. cover and set aside.Chill.
-A half hour to hour before you are ready to serve the salsa, marry the two together and let them sit and talk.

THE END!

Come back soon for Haupia, a yummy Hawaiian dessert.

 RED VELVET *Cake Batter* ICE CREAM
*Speckled with RV cake crumbs
*Swirled with cream cheese frosting
*In French tuile ice cream cones

After being told repeatedly that school is in session, that I can no longer where white as of September 6, and that apples pies are in order. I continue to have the inspiration to make ice cream flavors instead of making  hot cocoa. There are still a couple more ice creams on my list that I REALLY want to make but, they may have to wait until next summer.

So, this ice cream turned out exactly how I expected, for once. D-E-E-licious without the cake batter tummy ache. It tastes just like red velvet cake batter PEOPLE! But...it's ICE CREAM! Cold, sweet , creamy, yummy, red velvety ice cream.

If you  happen to like red velvet cake and...um...that flavor at Cold Stones called "cake batter". This is the flavor for you. Yep, that's right. How can I get you walking away eating a brand new ice cream favor today?
RV cupcake baked from left over box cake mix

Aside from having a little trouble working out the cream cheese frosting swirl, the recipe was quite simple.
You don't even really need to add in the cake crumbs or cream cheese-I just thought of it at the last minute and had to get fancy. But, it means you have to make RV cake and whip up frosting too, which can be fun, you'll have extra RV cupcakes to share with...family? Friends? Co-workers? :)
Here's the recipe...

Red Velvet Cake Batter Ice Cream Recipe
 Ingredients:
1/2 cup red velvet powder cake mix from the box, sifted
1-2 tablespoons powdered buttermilk, sifted
2 egg yolks
1/4 cup sugar
1/2 cup milk
1 cup heavy cream
1 tablespoon vanilla bean paste or vanilla
1/2 cup red velvet cake crumbs
Cream cheese frosting (Whip 1/2 of an 80z cream cheese pack at room temp and
1 tbs powdered sugar)

-Sift cake mix and buttermilk together and whisk to mix
-Beat 2 yolks with  sugar until pail
-In a medium saucepan whisk milk, cream and vanilla
With heat on low to medium-low:
-Whisk in egg mixture and cake mixture.
-Constantly stirring, let heat to 160 degrees F, read my a candy thermometer
-Take off heat immediately and pour into a boil. Whisk once more and chill.
-Pour chilled "custard" into the ice cream maker.
-Add Red velvet crumbs after 15-17 minutes of churning or when ice cream is freezing and no loner liquid-y.

-After Ice cream is done churning, gently fold in the cream cheese frosting as best you can
-Chill in freezer for 2 hours and serve.
 OR....Maybe...make ice cream sandwiches?

THE END, STAY CUTE!
Mini Banana Cream Cheesecakes 
with Bavarian cream

I am really enjoying the elegant and sophisticated idea of Mini cheesecakes. And so far, I have made it a reality twice. With Mini Red Velvets and now with Banana Creams. Being able to individualize each dessert is so much fun and you don't have to worry about slicing the cheesecake with the knife in water thing to make the slices look pretty.

So if you want to give mini cheesecakes a try but you don't want to buy 12 mini cheesecake spring-form cake pans at $6.95 a pop. Do what I do, and use ramekins. I understand you may think this is too much work, but it's really not and you can pre-prep all this before you start making a mess in the kitchen with the cream cheese. I think it's worth it because you can buy a 4 pack of ramekins for around $4.00-$6. Say you needed to serve 12 people...it would cost you $18.00 BUT, if you bought fancy spring forms it would cost you $83.40. So you are saving $65 bucks! Plus I have accumulated my ramekins over time, so I didn't have to go out and buy all them at once.

Did  I convince you to read ahead on how to do this? :)
Good, Ok so....
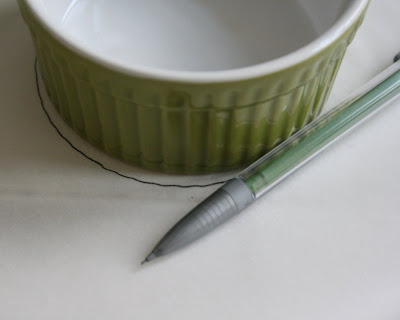
-Trace the size of your ramekin on parchment paper with a penscil, then stack 12 square pieces of parchment and cut away with your shape. Make sure to cut just inside the pencil line.
-Then cut out strips of parchment paper as well that are long enough to stick out of your ramekin an inch or so on each side.
-Place strip in the ramekin and crease if needed. Then fold teh tabs back around this lip (like seen in the third pic down from here)
-Then place your circle in the ramekin on top of your strip.
-Then place ramekins in an a baking pan lined with aluminum foil. Place pan on oven wrack and pour boiling water until half way up your ramekin. place sheet of aluminum foil over pan and bake at 350 for 15 mins then at 200 for 45 mins or until center only slightly jiggles. Let cool. Then Chill overnight or freeze for half hour to hour. When the cakes are well chilled they are easier to handle and pop out of the ramekin.
-Carefully run knife around edges and gently pop the cake out.
 For the molding of the Bavarian cream, surround the cheesecake with a folded strip of aluminum foil or a plastic mold piece if you want to get profesh and have smoother lines.
-Pour 1/4 cup Bavarian cream on top of each cheesecake and chill for 3 hours. (wow, you can tell I didn't do a white balance on these next pics. Yikes.)
-Then take off aluminum foil gently and smooth edges of cakes with a butter knife.

Decorate with toasted coconut shavings, chocolate, and bruleed banana slices.
Oh and if you are looking for some cheesecake tips, I posted some with the Mini Red Velvet Cheesecake Recipe.
THE END!
A SIDE NOTE: The Cupcake Wins
I was wondering if cupcakes were on the down-trend and if any other new trendy sweets had a chance of becoming the new "cupcake".

So, I posted a little poll here on my blog, uh huh, it's to the right and down from the very words you are reading now.
I realize my little poll did not get a great representation of the world and what they think about sweets. I have to say though, that the people who took my poll, have great taste. YOU have great taste....

YES, CUPCAKES ARE THE BEST. STILL. AND ANYTHING HOMEMADE IS BETTER. :)

The very three*3* REALLY TRENDY sweets right now that are getting all the attention besides cupcakes are:
-Whoopi Pies
-French Macarons
-And Red Velvet

And I thought they would be the favorites in my poll. People are writting about them everywhere! Every kind of whoopi pie flavor is springing up on blogs, magazines, and in bakeries. French macaron cookies have certainly hit high popularity in the last five years and every gourmet flavor on the planet has been made in form of a macaron. And you can find red velvet anything anywhere, I have made red velvet stuff at least five times myself and am working on another project right now.

Yet, these three received none or the lowest votes of popularity in my poll.
What do you think about this?
I, personally do not get the whoppi pie thing yet.
I think macarons are really gorgeous, but eating them is not that satisfying.
And I love red velvet but, you can get tired of it after a while.

So, cupcakes still remain the favorite. They are the classic, simple, iconic fun dessert that kids and grown ups love. They can be enjoyed the classic way with rainbow sprinkles or dressed up in gourmet flavor combos giving them a wide range of appeal.

Actually, I just thought of this. They are like 80's music, it was good then, and it just gets better and better as time goes on. However, there were some really bad 80's songs. And I have had a couple bad cupcakes. But, so many 80's songs were REALLY, REALLY GOOD that you ABSOLUTELY LOVED and LOVE and are your favorite songs of ALL time! Like cupcakes. You've had some pretty darn good ones huh. :)

I love 80's music and I would also consider myself a big cupcake fan.I need to eat a cupcake while at an 80's party though.
Anyway, I am a cupcake fan. It's why I started this blog in the first place. My favorites are cupcakes that people have made or I have made myself. They are just better.
HOMEMADE is better!
They are made with love and creativity. And I think that is more exciting than buying a cupcake for five dollars. And you don't know who made it, what they put in it, or what they were wearing last week when they made it.
When something is homemade, you can just feel the comfort of fresh, home-baked goodness that is so satisfying. Plus when you make something at home you can control exactly what goes into your product and are so proud of what you have accomplished.

Plus, commercial bakeries pack their stuff full of sugar and crisco. Bleghk. Even most recipes call for a lot of sugar and I usually cut it in half or even more if I can. For frosting recipes, they usually call for two sticks of butter (1 cup) and four to five cups powder sugar. WOW! That's a lot. And that much sugar just isn't good for us.

I add about 1/4 to 1/2 a cup and it's sweet enough for me. No one ever complains that my cupcakes aren't sweet enough. And if you need that pretty piping quality for your frosting, a cup or two is plenty.

Anyway, I hope you have a delightful weekend full of homemade cupcakes!

THE END!
DINNER MENU: Stuffed Shells
"Ooooooooow, Ivy, stuffed shells, how fantastic!
It has been such a random gloomy day here in Los Angeles. Bleghehkgh.
I think A delicious comforting dish for dinner like....stuffed shells is in order.
Oh my gosh! Is Summer really over? NO! I refuse!
Well...today I will embrace the gray skies and will cozy up to stuffed shells but don't think this is the end for me. I still have a couple ice creams to make. :)

Well, I talked briefly about stuffed shells before, RIGHT HERE *where the picture is much better than the one below*, but I didn't do the whole recipe thing so, I thought it would be fun. It's one of our favorites and is pretty easy. They do take a while though because of the baking time in the oven.
I think most jumbo pasta shell boxes have recipes right on the box you could follow.
I like filling them with ricotta cheese but you could do meat too. I just throw whatever seasoning I have on hand into the cheese and mix it up. No need to get exact with Italian food. Right?

Italian seasoning
finely chopped garlic
finely chopped onion/shallot
Dill
Fennel seeds
Pesto-homemade or not
Oregano
Basil
Rosemary
finely grated Parmesan or flavorful cheese
a pinch of crushed red pepper
Anyway.. you get my point-just through in some Italian-like flavors.

I make them different every time. It's fun that way.

Stuffed Shells
Makes 12 shells
Ingredients:
-Jumbo Pasta shells,
Olive oil
2-3 garlic cloves, finely chopped
1/2 and onion or a medium shallot, finely chopped
1 tbs Dill
1 tbs Italian seasoning 
pinch crushed red pepper
1/4 cup red wine
Medium container ricotta cheese
salt and pepper to taste
1 package mozzarella cheese
Parmesan cheese block

What to do:
-Boil pasta shells for 15-20 minutes *always boil a couple more shells than what is needed because some end up ripping and you can't really use them.
-Saute onion, garlic, crushed red pepper, dill, pepper, fennel seeds and your seasonings in 1-2 tbs olive oil until garlic and onions are soft and transparent.Set aside. Or chop all seasoning and garlic in a food processor and skip the skillet.
-In a large mixing bowl mix the ricotta cheese with you seasoning mix and add 1/2 cup finely grated Parmesan cheese. Set aside
-Strain pasta shells and rinse with cold water (so you can handle them and not burn you fingers)
-Line a square baking dish with foil (for less mess) and sprinkle with olive oil.
-Take a shell in you hand and with a large spoon, scoop a spoonful of the ricotta mix into the shell and place it in the baking dish. "rinse and repeat" until you are done.
 -In a large bowl, and this is optional, mix 1/4 cup red wine to your red sauce.
-Pour red sauce over the shells, completely coating them. Cover shells with foil.
-Bake at 375 degrees for half hour to 45 minutes.
-Sprinkle grated mozzarella cheese over top of the sauce and then (for prettiness) sprinkle some Italian seasoning or dill over the cheese.
-Continue to bake uncovered until cheese is deliciously melted (5 minutes)
Serve with a healthy salad and or garlic bread like when I made it HERE.

Ciao!
Hello Dapper Ones!
I hope you had a lovely Labor Day weekend! And you are refreshed and ready for what the week has to bring. You can do it. I believe in you. "You're good enough, smart enough, and doggone it, people like you. :)


I have been working on a couple things lately to share but, have not arrived at my finished products to show you quite yet. In the meantime, Here is a cute blog  that I have been ABSOLUTELY adoring lately. I mean I love doing the Kiiiiind on stuff they post and had no idea a blog like this could exist. They are in the business of being kind and I love it.


and a video that combines two of my favorite things:
Music from the Movie Amelie and Cupcakes!